Beginners project Create a Quiz Calculator web page project for kids with help of Html, CSS and Java script.
Quiz Calculator

This is a small project for beginner programmers and very helpful for their learning. This is a front end web page project. We will use Html for our base, CSS for styling and JavaScript (JS) for our functionality.
After opening folder in IDE create a html file with the name index.html.
At the end I will leave few questions and tasks for fellows.
so lets get started.
Html, Body Section
Now create a new folder and open virtual studio code (VS code) or any other integrated development environment (IDE) you like to use. we will discuss about IDE's in other articles soon.
After opening folder in IDE create a html file with the name index.html.
Note: "Name index.html is important. No other name can't be used."
Now in this file write a basic html code. Like select document type, start html file and select language and add head and body tags. In head tags add basic meta tags and title "Quiz Calculator for kids".
Now our basic html page is ready. look like:

Nothing on it but title only as we set in html document:

Now in our body tag create a form to get input from user by using form tag with class and ID "form".
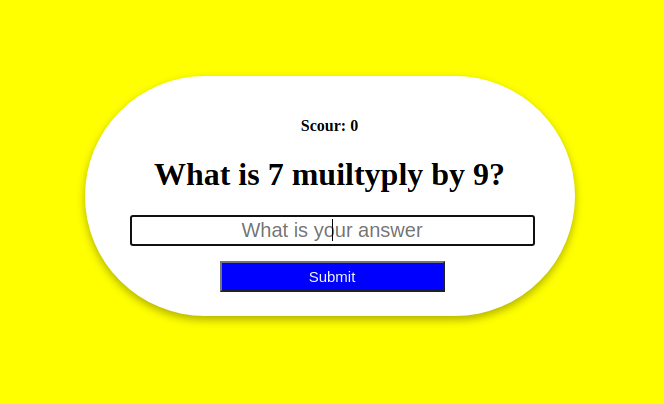
In this tag make a heading using "h4 tag" to show our present scour. Set it's id and class "scour" and show Scour zero like (Scour: 0).
In next step add an other heading with "h1 tag" with id and class "qus". In this section we will ask question form the user e.g "What is 3 multiply by 3" or any.
Now to get input from the user and use input tag, set type "text", class and id "input" and turn off auto focus and auto complete. We can use a placeholder to show the user where to answer the question.
Next create a button with button tag, set type "submit", class and id "btn" show Submit.
close form tag.
Now our page look like:

and our code in body tag:

Our body or html part is complete now. So, Now let's move towards CSS or styling section.
CSS Styling
Now in the same folder you create HTML file create style.css file you can use any name instead of style but .css extension is important.
Now go to the html file and attach the css file with the html file in the head section using the link tag set relation (rel) "stylesheet" and href "style.css" or whatever name you have chosen, I'm using "cal .css”.

We are now ready to style our calculator. Let's go to our CSS file and get started.
Open CSS file and start styling body{} part set display "flex", margin "0%", justify content "center", align items "center", set height "100vh", background colour "yellow", text align "center", font family "Time new roman, times, serif".
take a look on our page:

code:

Now everything is in the center but we need to set our form.
So, now select form by its id .form{} and start setting it.
Set background colour "white", padding "20px" from all side, box shadow "0" from top "4px" from bottom and "8px" from right and left, border radius of "150px", margin of "10px", width of "450px" and height of "200px"
Let's see the position now:

Code:

Good now set our input section.
select by class .input, set display "block", box size equal to border box, font size "20px", padding "2px", text align "center", set left margin "25px" and width "90%"
Now have a look:

Code:

We need to set our submit button.
select it with .btn class, again display "block", width "50%", left margin "115px" and top margin 15px, padding "5px" top and bottom and "0" from right and left, cursor type "pointer", background colour "blue" and color "blue".
check the page now:
Code:

Now add some style in button.
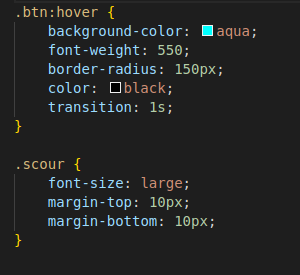
To add hover effect select .btn class then :hover{}.
Set background colour "aqua", font weight "550" to make it bold, border radius "150px", colour black and transition "1s".
Now make some settings of scour section. Select .scour class. change font size to "large", top margin "10px" and bottom.
let's see now:

Code:
Our Css styling is complete now. Let's move towards our JS functionality.
JS Functionality
Now create a .js file in the same folder of any name. I am using cal.js.
Open the index.html file and link the file with a script tag in the body section.

Now open the cal.js file.
For the first value of our query, create a constant variable named "num1" with the math.ceil function to set its range to 10, using the math.random function to randomly change its value. do
Repeat the same but rename the variable "num2" for the second value in the query.
Now create third constant variable "num" and set its value product of "num1" and "num2". "num" will be the answer to the question.

To randomly change our query, create a new We need to replace 2 values of our query with "num1" and "num2". For this create a constant variable qusEL and pass the question element by its id to the document.getElementById function and replace the first value with "num1" and the second with "num2".

Now call the form element to get the user's response and call the input element to check the user's input value against the "num" value.


Again create a variable scourEl, and pass scour element then change it's value and set it equal to scour variable, we created for local variable.

Now create a event in which whenever user click "Submit" button the value in input section enter by the user become equal to a new constant variable "usrans" in the event.
Now set a condition if "usrans" = "num" then add one "+1" in the scour value and update to local storage. else, if "usrans" is not equal to "num" then minus one "-1" from the scour value and update to the local storage.

Next step create a function to update local storage and convert scour value to string.

And all done we are ready.
Comments
Post a Comment